Digital Gauge Instructions

If your car’s air conditioning is blowing warm air when it shouldn’t be, repair and recharge your auto A/C system with a A/C Pro Recharge Kit.
Discover the quick and affordable solution to fix your own A/C in just ten minutes. Our specially designed formula will help your auto A/C produce cooler air, sealing common leaks within rubber compartments.
Follow our simple step-by-step instructions below to see for yourself.
Warning: Always wear gloves and safety goggles.
1. Turn engine & A/C on
Start car and turn on A/C to its highest settings – MAX-COOL.

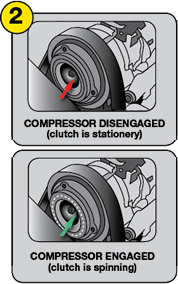
2. Determine if compressor is on
With A/C on, determine if compressor clutch is engaged (cycled on).
Tip – If the compressor is not cycling on, add half a can of refrigerant using instruction 7.
If the compressor still does not engage, repairs may be necessary.
3. Find service port
Locate the vehicle’s low pressure port on the larger diameter aluminum tubing, between the compressor and evaporator.
Remove the plastic cap from port and save.
Visit our port locator for help locating your low pressure service port.

4. Remove shipping disk
Unscrew trigger dispenser from can and set can aside.
Remove red & white shipping disk by unscrewing and discard.

5. Attach quick connect
Attach the quick connect fitting on end of recharge hose to the low pressure port (the only port it will fit onto) by simply pushing the fitting on to the low pressure port – you will hear a click.
DO NOT PULL TRIGGER as it will release refrigerant from the vehicle.

6. Read pressure
Rotate the blue dial on the gauge until the center arrow in the “V” on the clear plastic lens points to the ambient (outside) temperature (if temperature is between 85°-115°F, point red arrow at 85°F).
Read pressure when the clutch is engaged. If the gauge needle is past the “V” please read instruction #2.
If the gauge needle is before the “V” please read instruction #7.
If the compressor is cycled on and the pressure is in the red, do not attempt to recharge. Seek professional help.

7. Charge
Pull ring back to disconnect recharge hose from vehicle and screw can on to recharge hose (can is now ready for use).
Do not remove trigger from can until empty.
Reconnect quick coupler to low pressure port. Shake can well. Hold can upright to charge, shaking and rotating from 12 o’clock to 3 o’clock every few seconds. Squeeze trigger to dispense contents.
Continue process, releasing trigger every 10 – 15 seconds to check system pressure with the “V” range on gauge. Continue this process until the system is fully charged (PSI is in green zone) or can is empty.

Warning: Be careful not to overcharge your system.
Note: For cans purchased without charging hoses, follow instructions on charging hose (purchased separately).
8. Completion
It is possible that the can will not be empty when finished. In this case, after disconnecting from vehicle, simply leave the recharge hose on the can and store in a cool dry location.
If the can is empty, hold upside down for one minute to dispense any remaining product.

Disconnect from vehicle and simply unscrew the can and discard.
The recharge hose may be used again with any R-134a can with a threaded cap. Replace the plastic cap you removed from port during instruction #3.
Tip – It is normal for the recharge hose and gauge to hold pressure after use.
Explore our helpful list of FAQs or contact us directly for more information.
Related Articles